Cloud Confusing
Explaining hosting, AWS, Wordpress, static sites, and all manner of cloud solutions.
How To Host a Static Web Site on AWS S3 For Almost Free
Amazon Web Services is an intimidating thing. After all, some of the largest, most active websites in the world are hosted there. But that doesn’t mean hosting a website there needs to be difficult. In fact, as AWS has matured over time and now it’s at the point where anyone with a minimum level of technical understanding can host a site using AWS.
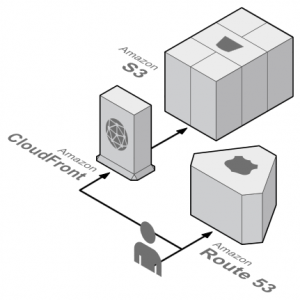
One of the coolest “Easy Mode” features the AWS team has setup is the Website Hosting Quickstart. This is an easy way to host a static website on Amazon’s S3 (Simple Storage Service). Just to get the basics covered, S3 is simple a place to put files on Amazon’s cloud. It storage files and can show them to people who you give permission to (including everyone). It has some routing logic that can be applied to files in a directory structure, but that’s about it. A static website is a site with no database or dynamic elements. The cool thing about a static site is that it doesn’t require computing power (like Amazon EC2), it just needs to hand off HTML, CSS, and Javascript files to a visitor.
What is a Static Site?
A static website is a site that have no database. It’s composed of static, unchanging page. If you need to host a WordPress blog, that is not a static site, it’s a dynamic one, because of the database. If you were to save all the web pages that WordPress’ PHP engine produced as .html files and upload them to a host, the combined sum of them would be a static web site.
How to Build an S3 Website
This is the heart of your task today. What you need to do is go to AWS S3, create a bucket, and name it the name of your domain name. That’s right: call it mysite.biz. Now make the bucket public. AWS is going to seem like it doesn’t want you to do this, which is the normal situation with an S3 bucket. Do it anyway. Websites need to be public.
Once the bucket is created you need to go into the bucket settings and turn it into a website. This is easy: go to Properties > Static Website Hosting. Now pick “use this bucket to host” and then define your index files (something like index.html).
At the top of this box, you’ll notice your website endpoint. This is very important! You will want to use your S3 website endpoint when talking to AWS about your S3 site. This will be critical when working with CloudFront and when setting up redirection rules.
You’ll also need to create a bucket policy to actually make it fully public. It’ll look like this:
{

"Version": "2012-10-17",

"Statement": [

{

"Sid": "PublicReadGetObject",

"Effect": "Allow",

"Principal": "*",

"Action": [

"s3:GetObject"

],

"Resource": [

"arn:aws:s3:::example-bucket/*"

]

}

]

}
Just replace the “example-bucket” string with your bucket name. This is the name you gave the bucket, not the website endpoint.
Adding WWW to Your Static Site
With the domain associated, you have a working website, but the www version of the site will create an error. As great as the Quickstart tool is, it doesn’t account for this, but it’s an easy fix.
Hop over to the S3 console — you’re see your static site in there! — and create a new bucket. Name it “www.MySite.biz”.
Now click into that bucket and navigate to the Properties tab. You’ll see a menu in there that says “Static website hosting.” Open this and choose the option that says “Redirect Requests” and then type in the domain name you associated with your static site’s S3 bucket. In our example we’d type in “MySite.biz” and hit Save.
What we’re doing here is creating a second S3 bucket that forward people from www.MySite.biz to MySite.biz. This works for any visitor to the site, including the GoogleBot and others. You will have a fully functional site and while you can’t use www. this subdomain will technically be fully functional and adherent to web standards.
Static Site Domain Name
This part is pretty easy, but not obvious at first. Go you Route 53, AWS’ domain name tool. Create a hosted zone, which is where you define the DNS information about your new site.
Now Create New Record and make an “a” record. The stuff you need to define goes like this:
- Name: mysite.biz
- Type: A – IPv4 address
- Alias: Yes
- Alias Target: Your website endpoint from the Website Static Hosting box. Don’t pick the predefined S3 endpoint that will be in the drop down. This will technically work, but you will not be able to do any advanced functions. Seriously, resist the urge!
- Routing Policy: Simple
- Evaluate Target Health: No
Click “Create” and you are good to go!
If you want to configure your site with “www.” then simply do all the steps above but for the record name at the top, fill in “www” ahead of your website name. The rest will be all the same as previous.
The Journey Begins
At this point you have a static website hosted on AWS. You can revel in that for a moment because it’s a pretty incredible thing. The cost of the site will be nearly zero — S3 storage is free or practically free, the Route 53 hosted zone is $0.50/month, and bandwidth is cheap. You can roll out dozens of site and you will barely see a bill unless you are moving around lots of and lots of files or seeing massive traffic. And in addition to being cheap, your static site should be highly secure and have great performance thanks to S3.
In upcoming articles we’ll take this from Easy Mode onward as we run through some next steps, such as HTTPS handling, bucket policies, and CloudFront setup.
Update: Confused about your DNS? This article explains hosting an S3 site with Route 53 DNS
Also, you might want to add SSL. Don’t worry, it’s easy.
— Outdated Information —
Host a Site on S3 Using the Quickstart tool
As of mid-2018 the S3 Quickstart tool no longer is live! These directions are here solely for history purposes.
Because this is the beginner version of the tutorial, we’ll use the Quickstart tool linked to above. It’s super easy to use, but makes a few decisions for you that professional’s might not agree with. But, trust me, I’ve used it dozens of times and it works great.
So login to your AWS console or click the link. Tell AWS that you’d like to create a new site. You will see the following:
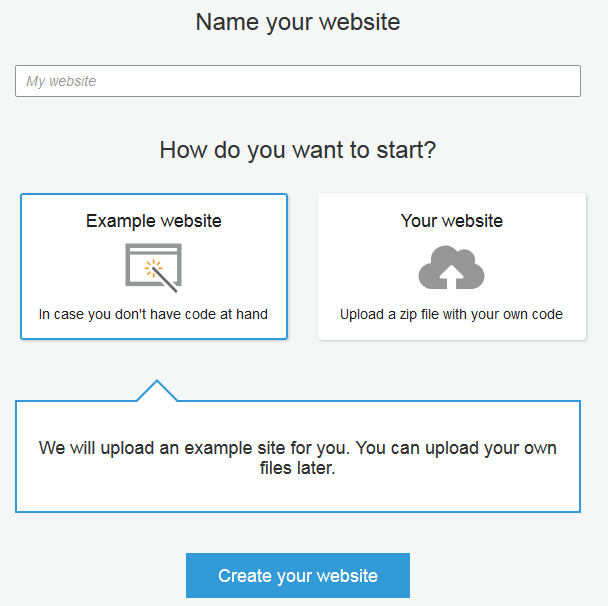
AWS Static Site Wizard
At this point name your site and then choose “Your Website.” Here the site name is just a friendly name, so choose whatever you’d like (you’re not handling the domain just yet). You won’t be able to create a site until you drag your files over to the box at the bottom. In the case of a static site you’ll need a .zip file that contains your index.html file, at a bare minimum. More robust sites can include multiple folders, image assets, Javascript files, robots.txt, and a whole lot more. If you don’t have a site you can choose “Example Site” and Amazon will provide you with something.
Regardless of the option you choose, you then create your site. At this point you will be sent to the main screen. Here you can see a preview of your site, give your site a domain name using Amazon’s Route 53, check your CloudFront (Amazon’d CDN status), or update the site. If you don’t want a custom domain name, you’re actually all set right now! AWS will provide you with a link that looks like this: https://randomlettersandnumbershere.cloudfront.net. That might be ugly, but it’s a fully functional link to your site!
The setup of all this should take Amazon about 10 minutes, after which your site is fully set! You’ve made a website and hosted it on AWS!
If you want to update your site, just go back into the Quickstart tool and drag a new .zip files onto the page. Amazon will uncompress the file, read the contents, and tell you how many files are changed from your previous build. If you accept the changed your site will be updated with the new files.
If you want to edit the files, review the contains of the site, management permissions, delete files, or delete the website entirely, then you will have to go to S3 to do that. After all, all the Quickstart tool does is give you an easy way to use AWS’ S3 and make a few choices for you. Any sort of manipulation or advanced features will be done through the standard S3 toolset.
Adding a Domain Name to a Static Site
OK, so the static site is built but now it needs a domain, like MySite.biz. You can buy the domain from wherever, but for our example we’ll be using Route 53, Amazon’s DNS and domain name buying service. This is very simple to do, just go to Route 53 and buy a domain. Now do to your website in the AWS Quickstart tool and in the “Domain” box choose to “Buy a Domain.” Choose this even if you already bought one (Amazon didn’t get the language right here). You’ll get this:
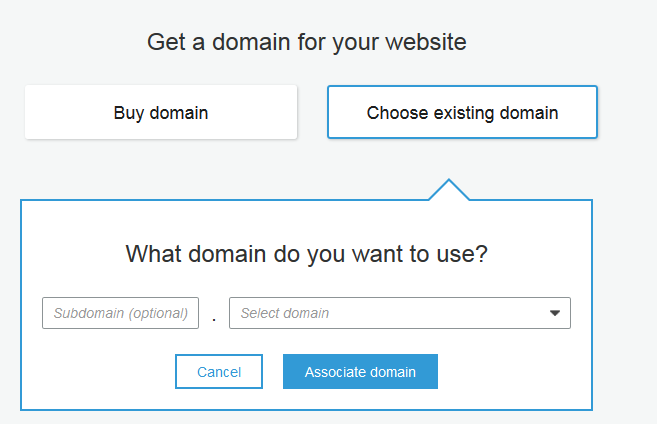
Since you already have a domain name you just need to select the domain from the resulting dropdown and associate it with the static site. You can buy one from here as well, but you planned ahead, right? With the domain already purchase, you just select it from the dropdown and associate it with the S3 bucket where your site lives.
Not the subdomain field at this point. You can put whatever you want there or you can leave it blank. The most popular option will be leaving it blank, while some people will want to have the default entry of their site start with “www.” Both are great options, but you will have to account for this choice later. You could add another subdomain here as well, like example.MySite.biz.
Let’s leave the subdomain blank and move on to other things.
Here is a working example of an S3-hosted static website.
Sal September 16th, 2019
Posted In: AWS
Tags: Amazon S3, AWS, Hosting, Route 53, Static Website