Cloud Confusing
Explaining hosting, AWS, Wordpress, static sites, and all manner of cloud solutions.
How To: Cheap WordPress Hosting on AWS with Lightsail
It used to be that hosting WordPress on AWS was a difficult task. You needed to deal with EC2 and the huge AWS management console with its dozens of tools and hundreds of options. Then Amazon introduced the AWS Marketplace and “WordPress powered by BitNami,” which made things easier but left many of the same hurdles in place. Then, finally, Amazon introduces Lightsail, which is basically AWS on easy mode.
- Added a guide for moving your Lightsail site to HTTPS
- 9/5/2018 Update: Added FAQ section at the end.
- 10/8/2018 Update: Refined the DNS section.
What is Amazon Lightsail?
In case you aren’t familiar with it, Amazon’s Lightsail is a virtual private server (VPS) that starts as just $5 a month. It’s a cloud solution that offers considerable control of the server environment, multiple different cost tiers, SSH access, static IPs, and near-instant deployment, but without any infrastructure or hardware concerns. Lightsail is Amazon’s answer to DigitalOcean’s droplet (which pioneered the $5/month plan) and an user-friendly tool that let’s people with a basic understanding of ops spin up servers and projects quickly.
Lightsail is known for its easy of use and low barrier to entry (both from a price and skill level), but also has other advantages, like complete avoidance of the AWS console and highly predictable pricing. It’s almost entirely self-contained, which means you won’t need to use all the enterprise-level AWS tools to do simple tasks, but you still have access to them if you need. For example, you can use Route 53 for DNS, or you can just use the tools baked into Lightsail.
WordPress on Lightsail
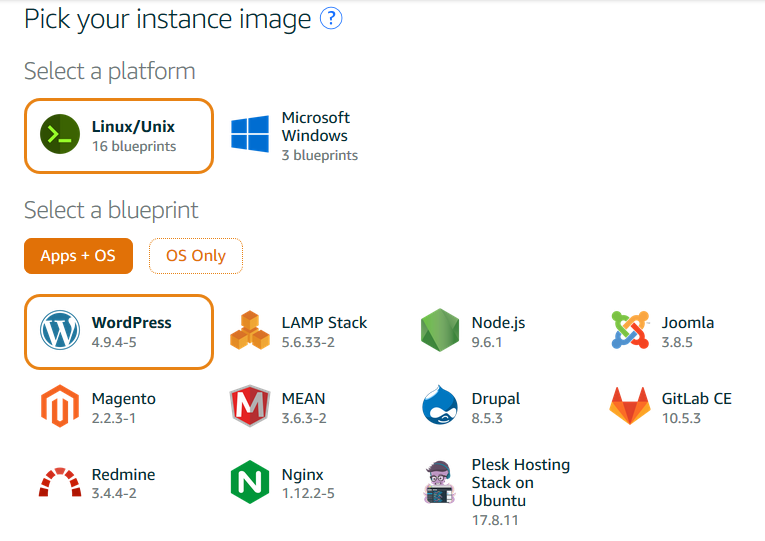
After hop into Lightsail, hit create new instance (this is a VPS after all) and you’ll be greeted with this:

You’ll want to choose a Linux server with WordPress (latest version) pre-installed. At this point you could also setup an OS-only box with Amazon Linux, Ubuntu, Debian, FreeBSD, openSUSE, or even a Windows server (Windows 2012 R2, Windows Server 2016, or Windows + SQL Server 2016 Express). We’ll pick Linux + WordPress and then see this basic information:

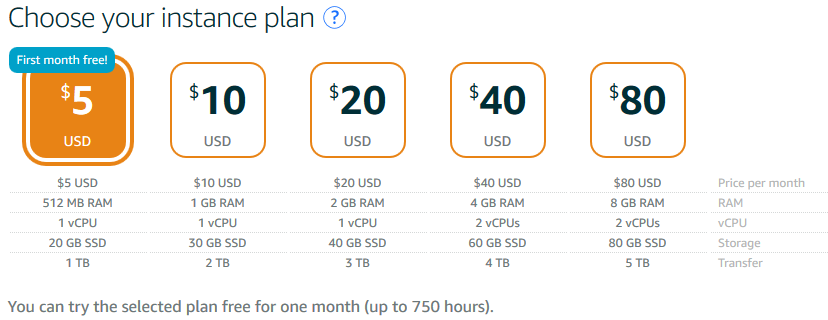
After this you just need to pick your plan. Ranging from $5 to $80, there is a big difference in the capabilities of the different setups. Here’s the current Lightsail instance menu:

Money money will get you more memory, more CPUs, more storage, and more transfer (bandwidth). Makes sense right? The takeaway here is that the $5 plan is quick capable of hosting a small blog or project website, and then it’s easy to scale up if your demand increases.
Pick your plan, create your instance, and you are done. No really, in about 10 minutes you’ll be able to login into a clean WordPress installation or SSH into a fresh new server. The VPS will have its own static IP, metrics and networking controls independent of the rest of your instances, load balances, a change history, and the ability to take backup snapshots.
WordPress Installed! What Next?
In case it’s not clear, your new WordPress site will live at an IP address, but the instructions to setup the site will be at: http://MY.NEW.IP.ADDRESS/bitnami/index.html. You can also get here by clicking the Bitnami logo at the bottom left of your new site. Welcome to the world of Bitnami, where WordPress gets weird (but also incredibly scalable)!
So you want to login to WordPress right? Your new username is “user” but your new password is unknown. To get it, you’ll have to SSH into the box (easily done through the Lightsail console) and type in:
cat bitnami_application_password
Bitnami will then reveal your password and you can use it to login to your WP installation at http://MY.NEW.IP.ADDRESS/wp-admin.
If you are dying to get rid of the Bitnami logo (don’t blame you), just end this command in:
sudo /opt/bitnami/apps/wordpress/bnconfig --disable_banner 1
You’re technically done at this point: you have a WordPress site, static IP for the site to live at, SSH control of the server, and an admin-level login to WordPress. At this point you could install some plugins, change the template, and start blogging. But you’ll probably want to fine-tune things a bit.
Lightsail DNS Setup
In Lightsail you can adjust the DNS of your instances without ever setting foot into Route 53. This happened at the top level of Lightsail (Home) not within an instance, so don’t click in too deep — just to to Lightsail and navigate to Networking. Here you can create a load balancer, a new static IP, or a DNS zone. You want to choose the DNS Zone.
First things first: associated your instance with a static IP. This is a nice perk of Lightsail (a free static IP) and it’ll help make things easier in the future.
Next you can go into the DNS Zone and copy down the name servers. You’ll have to associate those name servers with the domain name at your registrar. Maybe this is Route 53, maybe it’s GoDaddy, etc.
Next, assuming you will use Lightsail DNS (instead of Route 53 or another service), you’ll have to create your “A” records. Here you’ll just want to point the apex at your static IP — this will done with an @ sign as the subdomain. And then the conventional thing to do would be to point the “www” at your static IP as well. You can add any other subdomains you might want. And… that’s it! Route 53 is powerful but Lightsail is simple.
You can also add MX, NS, SRV, and TXT records, or you can more subdomains.
Closing Thoughts
At this point you have working WordPress installation on your very own virtual private server. This is, more or less, the best cheap WordPress hosting sold today, so long as you value control over simplicity. Lightsail is simple enough to anyone with some knowledge in operations, but it’s definitely not WordPress.com simple. The trade-off is that you have full access to the server via SSH, so you can do some very powerful things with that system, well beyond anything you’d be able to do with a hosted WordPress installation.
Only one big thing is missing right now: HTTPS. That’s a surprisingly complex setup given how easy the initial WordPress install was, but it’s free and very doable if you have 30 minutes to spare.
FAQ
What is the Lightsail + WordPress webroot?
/nas/content/live/cloudconfusing/
How do I find my WordPress credentials?
- The WP username for use at MySite.com/wp-admin/ is “user”
- The password for that user can be found by going to the Lightsail SSH terminal and using this command:
cat bitnami_application_password
How to I move my Lightsail site to SSL / HTTPS?
How do I remove the Bitnami logo in the corner?
Type the following command in the SSH terminal: sudo /opt/bitnami/apps/wordpress/bnconfig --disable_banner 1
I can’t find my .htaccess file. Where is it?
It’s in your webroot (/nas/content/live/cloudconfusing/) but you likely wont be able to see it using a $ ls command. It is there though!
How do I edit my .htaccess file?
First, go to your webroot directory:
$ cd /nas/content/live/cloudconfusing/
Then open the file with your preferred file editor. Nano is preinstalled on your Lightsail server, so it’s a good choice.
$ sudo nano .htaccess
You’ll likely need sudo unless you SSH’d in with custom permissions. If you used the Lightsail SSH console sudo will be required.
Does Lightsail include DNS or do I need a Route 53 hosted zone?
Lightsail includes it’s own DNS service. It’s simple but effective. You do not need Route 53. That said, you can use Route 53 for DNS if you want, you’ll just need to use the proper name servers and pay for the new hosted zone.
Sal October 8th, 2018
Posted In: AWS
Tags: Bitnami, Digital Ocean, Lightsail, VPS