Cloud Confusing
Explaining hosting, AWS, Wordpress, static sites, and all manner of cloud solutions.
Lighting for Developers: OS X, Desk Lighting, And More
Lighting of your computer and workspace is an important topic but not one that comes up very often. It’s something I’ve been increasingly spending time thinking about so I wanted to write down some notes and thoughts on what can be done to improve your lighting situation.
I’ve spent a lot of time thinking about lighting, and even wrote a book about LED lighting (back in 2012).
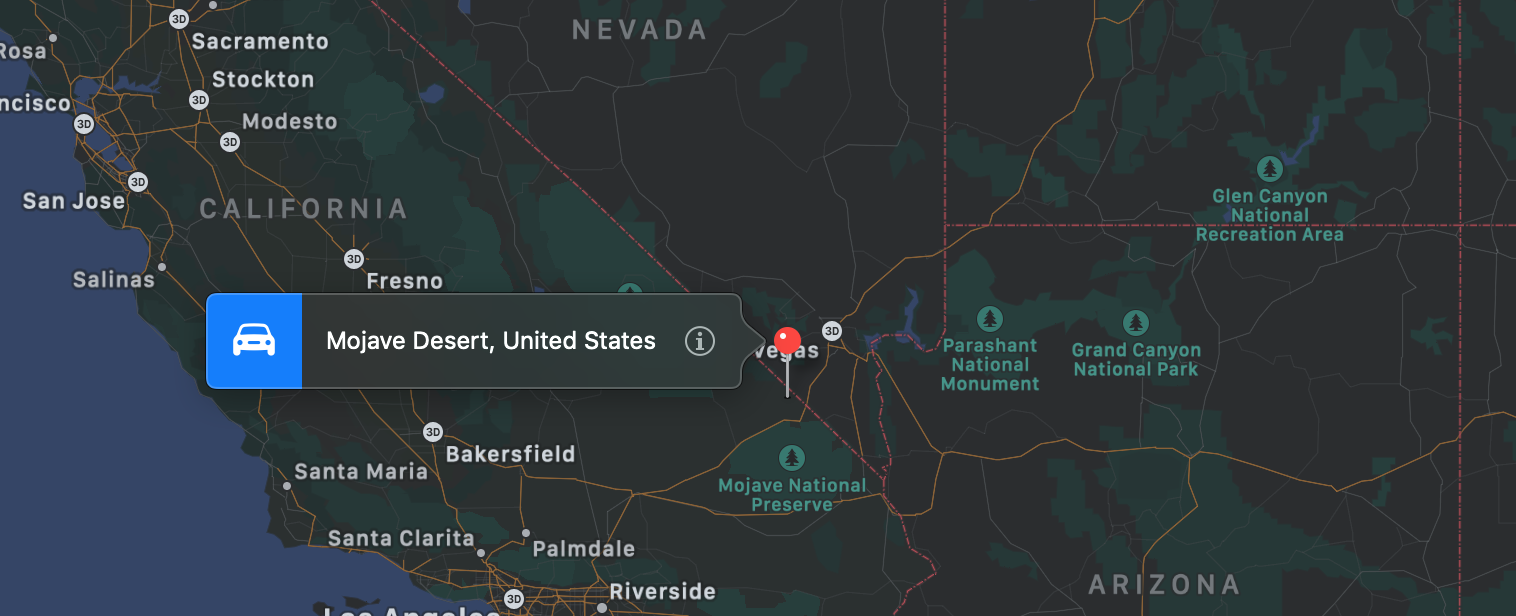
Apple Maps Dark Mode
Why Use Dark Mode?
My completely unscientific answer to this is that sometimes looking at a bright, blueish white display doesn’t feel good. And the longer I look at one, the less good it tends to feel. I know I’m not alone in this, and I doubt I’m alone in the concern about what looking at a screen for 40+ hours a week, oftentimes at night, is doing to my eyes. An increasing number of articles have come out about the negative effects of looking at blue lights at night, so I’ve become increasingly aware of what I’m looking at.
Apple macOS Dark Mode
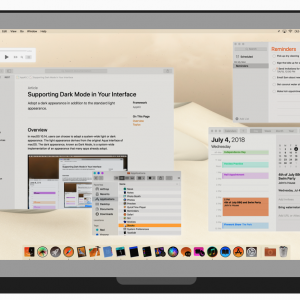
If you use Apple’s macOS (fka OS X) on your Mac (Mini, MacBook, or iMac, it doesn’t matter which) then it might not be completely obvious how to switch to a dark mode. This article will outline a few options that I’ve found to be helpful. Since some of these options use newer features, make sure to upgrade your Mac to at least macOS 10.14 (Mojave). This version of the OS introduced native Dark Mode as well as dark mode for built-in apps (including Mail, Messages, Maps, Photos, and Calendar) as well as an API for building dark views of other apps.
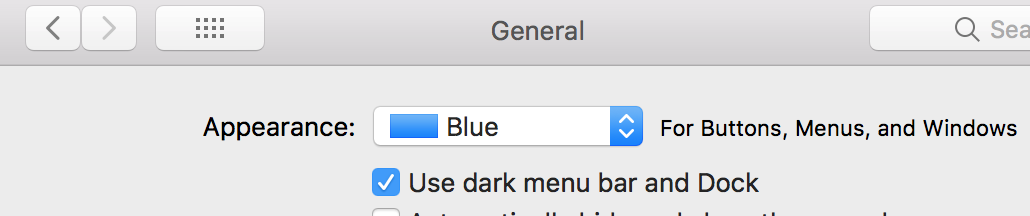
The only Dark Mode option in High Siera
To enable Dark Mode on your Mac you need to go to the Apple () at the top right > System Preferences > General. In High Sierra there was only a “Use Dark Mode” checkbox. Clicking it and you’ll get black trim on your desktop, but would do little else. With Mojave the Dark Mode Option is much more robust.
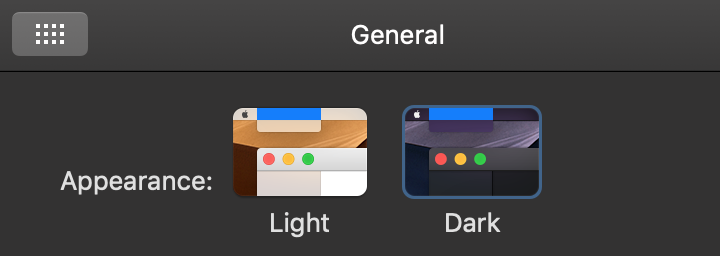
macOS Dark Mode
macOS Night Shift
Another great feature in macOS (one which is also on iOS) is Night Shift. This feature will make your display more yellow as the gets later into the night. What’s actually happening here is that the display is increasing the color temperature, which will turn the white on-screen from blue tones into amber ones. Your Mac’s display has a range from about 6500K (the most blue and closest to daylight) to 2700K (the most amber and closest to the light of a fireplace).
If you go to the Apple () at the top right > System Preferences > Displays > Night Shift tab then you will see this:
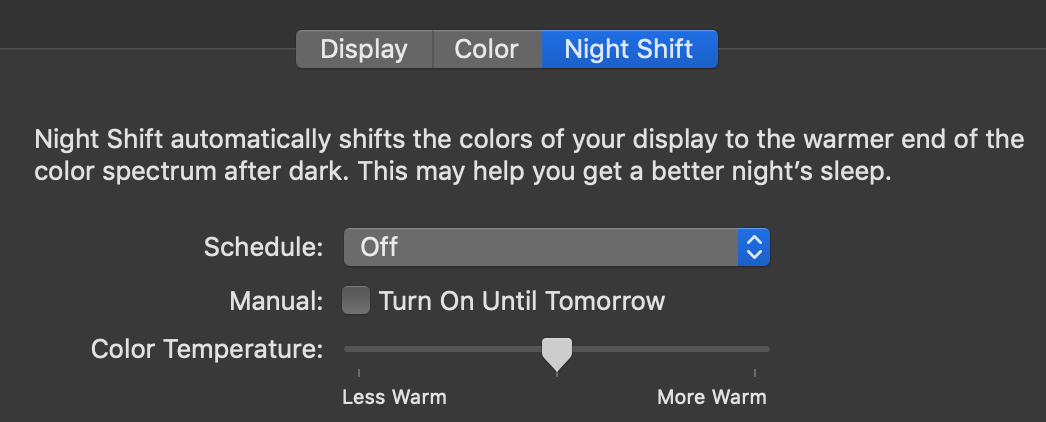
Night Shift
Color shifting as the sun goes down should help transition your eyes into the night time. It can be a bit of an issue if you are trying to work late into the night or are still at the office as you see your display start to night shift, but regardless of how you feel about dark mode or anything else in this guide, at least some color shift is something I’d recommend.
Color Inverse
Before there was Dark Mode something you could do to make your display a bit less harsh on your eyes was to inverse the color settings. This isn’t technically as effective since there will still be lots of white and brighter colors, but it’s surprisingly effective.
This can be done by going to Settings > Accessibilities > Display > Inverse Colors. Because this is somewhat cumbersome you can create a shortcut that makes it easier to do. You can make a instantaneous keyboard shortcut to do this Settings > Keyboard > Shortcuts tab > Accessibility item on left > Invert Colors. Just check off invert colors and set an easy to remember keyboard shortcut.
Chrome Dark Mode
If you want dark mode for the internet the easiest thing to do is to install the Dark Reader extension for Chrome. It’s surprisedly effective and much easier than piecemeal approaches, like separately enabling night mode for Google Support pages for your GCP API docs and then enabling dark mode for Gmail,
Lower The Brightness
Lowering the brightness of your display is something that’s easy to do, and effective at reducing eyestrain. Generally speaking, the larger the monitor, the lower the brightness you’ll need. If you have a high resolution (for instance 4K) this isn’t always true, but it’s a good rule of thumb.
Hardware Solutions: Desk Lamp
Yes, more light can help as well. Backlighting is a surprisingly good way to reduce eyestrain and increase comfort levels.
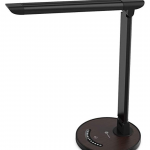
Taotronics
The easiest way to do this is with a desk lamp. Today’s LED lamps are affordable and have multiple color temperature and brightness settings so you can adjust them to fit your work mode.
Something like the Taotronics costs just $30, has multiple color temperatures, and even has built-in USB charging ports. I’ve used a similar lamp from Anker for a few years now.
The Benq Screenbar has emerged as an attractive and space-saving alternative to a desk lamp, but it’s more expensive and a good deal less versatile. If you ever move away from a proper monitor and to 100% laptop usage for instance, you are out of luck. That said the placement of the lights on the Screenbar are ideal in order to prevent eyestrain and give adequate light on your keyboard and desktop.
Benq also sells their high-tech e-Reading lights. This is a limited selection (just two models) of specialty LED lamps designed for computer workers. They have a much larger reach than cheaper lamps, making for better placement options, as well as an adjustable lighting range so you can shine light straight down or outward, changing between the two with a tab. It’s a better design than the $30 lamps mentioned before, but at 7x the price, it’s a big ask.
F.Lux
F.Lux has long been the color temperature software of choice but Windows and Mac users alike. It’s free, super effective, and lightweight. Highly recommended regardless of your OS.
Sal April 2nd, 2019
Posted In: Localhost / Environment